|
|
ARIANE: A Visual Programming Interface |
Ariane Reference Manual
Contents
1. The User's Interface
The user's interface is composed of a global menu, a tool bar and five internal frames (A, B, C, D, E):
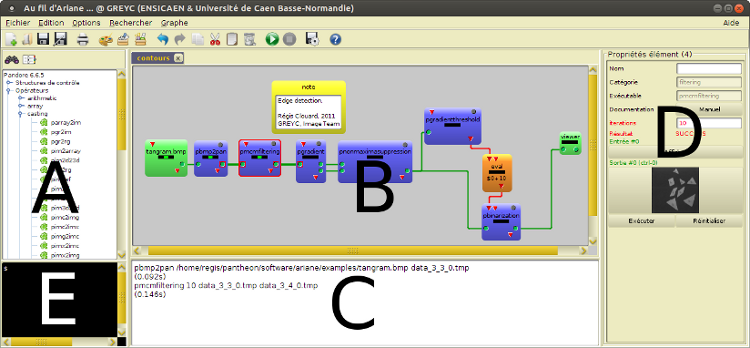
The frame A is the explorer which indexes all items and control structures that can be used to compose graphs.
Icon
 is used
to highlight all operators in the explorer that match a given name.
is used
to highlight all operators in the explorer that match a given name.Icon
 gives
access to the index of all operators in the associated library.
gives
access to the index of all operators in the associated library.
The frame B is the graph editor which supports graph composition.
The frame C is the console which displays interaction messages.
The frame D is the property windows which displays the properties of the current selected item.
The frame E is the terminal which allows users to add item in the graph editor by typing in the name of an operator.
2. Building a First Graph
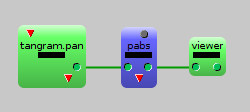
To understand how to create a graph like the one above, follow this sequence of actions:
Create a new graph by using the menu item File::New.
Add a first image loader, by dragging the loader item from the explorer (Frame A) to the graph (Frame B).
Double-click on the loader item to select a data file, or clock on the related button in the property window.
Add other items by dragging-and-dropping them from the explorer (Frame A) to the graph editor (Frame B).
Click on items to open their related property window (Frame D), and set the convenient parameter values.
End with an image viewer.
Link item inputs to some other item outputs by dragging-and-dropping the input slots to output slots.
Execute the graph by selecting the last item and clicking on the execute button in the property window.
This graph can be saved into an XML file by using the menu item File::Save.
3. Graph Items
Items that can be included in graphs are available in the explorer (Frame A). To add an item in a graph, drag the item from the explorer and drop it into the graph editor (Frame B).
a. Model
An item is represented as a box with connection slots.
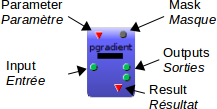
Inputs / Outputs. Inputs and outputs are regular data files.
Mask. The mask is a data file used to define the data on which the item will operate. A mask data file is generally an output data file of an other item.
Parameters. Parameters are used to tune the behavior of the item. Parameter types are item dependent (either numerical values or strings).
Output result. Each item returns a value. Convenient values must be handled by the status program (see Tab Runtime). The output result can be used as a parameter value of another item.
b. Contextual menu
To open the contextual menu, right-click on the graph item body. The contextual menu lists all actions that can be apply to that item.
c. Property window
To open the property window, click on the graph item body. The property window is used to set the parameter values, show the related documentation, and display the input and output data file contents.
4. Types of Graph Item
Items that can be included in a graph are listed below:
- A LOADER is used to load data from a file;
- A SAVER is used to save data in a file;
- A VIEWER is used to display data;
- An OPERATOR is used to apply an operation on data;
- A SYSTEM is used to execute a command of the operating system;
- A SCRIPT is a long text that can be used as a script for another operator;
- A CONSTANT implements constant as parameter;
- A FILENAME implements file as parameter;
- An EVAL implements arithmetic expression;
- A FORMAT implements string manipulation;
- A SELECT allows to select one output among several;
- A MERGE allows to merge two paths into one;
- A MACRO-OPERATOR is a subgraph;
- A control structure IF implements alternative;
- A control structure MERGE merges two data flows into one;
- A control structure FOR implements iteration;
- A control structure WHILE implements repetition.
- A NOTE is a comment inside the graph.
5. Preferences
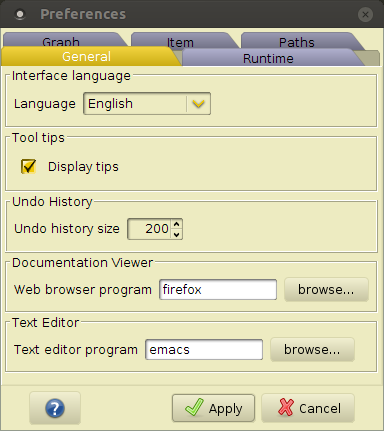
The preference dialog box can be opened with the menu item Options::Preferences. The preference dialog box allows you to set color, language and directory preferences.
a. Tab General
This tab is used to define the general settings of the interface for instance:
- Web browser: give the name of your favorite web browser that will be used to display HTML documentation. You can specify only the name of the command if it is a regular program or the complete path if it is a personal program.
- Text editor: give the name of your favorite text editor. You can specify only the name of the command if it is a regular program or the complete path if it is a personal program.
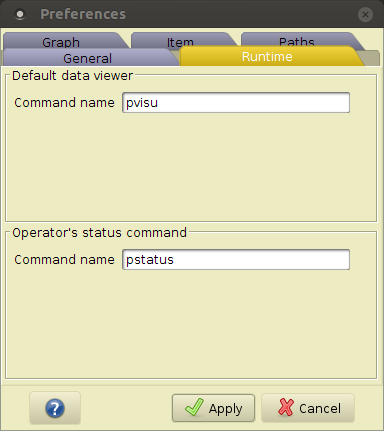
This tab allows you to select the program used to visualize the data file and the program used to display the operator execution status.
- Visualization display program: this program is used to
display the data files. Any program is available:
gedit, gimp, wordpad.
A different visualization program can be defined locally in each Viewer.
- Status program: Each item is supposed to return a result. The status program is used to display this result in the standard output. For example, this can be a shell script with the line: echo $?).
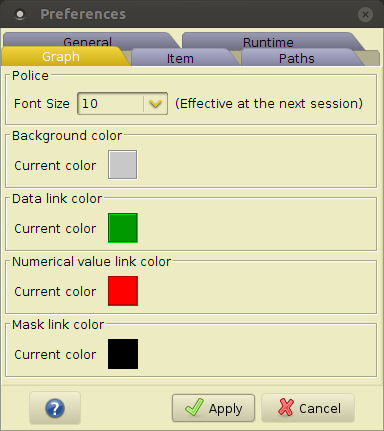
This tab is used to custom item link colors and the graph background color.
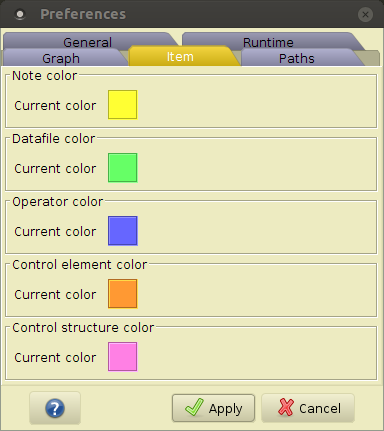
This tab is used to custom item colors.
This tab is used to define directory paths, for instance:
- Temporary directory path. Set this path to specify where to save temporary files.
- Data files home directory path. Set this path if you want that the file path be related to this directory. By default, file path are related to the project file directory path.
- Personal operators home directory. Set this path if you want that the personal operator path be related to this directory. By default, operator paths are absolute (related to the root of the file system).

6. Handling personal operators
To add personal operators in Ariane, use the menu item Options::Organize Personal Operators. Unlike the operators of the library which are visible to all users, the personal operators are only visible to their creator.
Available operators are executable programs by the way of the operating system. The calling syntax should be specified in the editor using the following convention:
- $m stands for the mask value if any. Remember that the mask is optional.
- $p stands for the parameters
- $i stands for the input images
- $o stands for the output images.
- [] is used to compose a group
Examples
- Example 1
pmeanfiltering [-m $m] $p $i $o
This example allows calling of Pandore operator with the optional mask introduced if given with the sequence -m, follows by the parameters the input images and output images.
For example:
pmeanfiltering 8 a.pan b.pan
- Example 2
/usr/bin/pmeanfiltering -i $i -o $o $p
This allows execution of:
For example:
/usr/bin/pmeanfiltering -i a.pan -i b.pan -o c.pan -o d.pan 12 3
- Example 3
/usr/bin/pmeanfiltering -i [$i] -o [$o] $p
This allows execution of:
For example:
/usr/bin/pmeanfiltering -i a.pan b.pan -o c.pan d.pan 12 3
To define a new operator, fill in the related dialog box: the name and the path of the binary, the number of parameters, input data files and output data files.
The ariane/operators.cfg file is an XML file (see Section Customizing for the storage folder) that describes the prototype of each operator as follows:
<?xml version="1.0" encoding="ISO-8859-1"?>
<ARIANE version="1.1">
<OperatorLibrary>
  <Operator>
    <Category>category</Category>
    <Name>myoperator</Name>
    <Documentation>http://myspace.org/operators/myoperator.html</Documentation>
    <Binary>./examples/myoperator.sh</Binary>
    <Parameters>2</Parameters>
    <Signature>$0:parameter name=default value;$1:parameter name=default value</Signature>
    <Inputs>0</Inputs>
    <Outputs>0</Outputs>
  </Operator>
  ...
</OperatorLibrary>
</ARIANE>
7. Handling subroutines
To store a subroutine in the current list of subroutines of the explorer, use the contextual menu associated to the subroutine created on the graph you want to store, and use the "store in the explorer" menu item.
To organize the subroutines into the explorer, use the menu Options::Organize Subroutines.
The ariane/subroutines.cfg file is an XML file (see Section Customizing) that describes the prototype of each subroutines as follows:
<Subroutine>
    <Category>utility</Category>
    <Name>EdgeSuperimposition</Name>
    <Documentation>file:software/ariane/edgesuperimposition.html</Documentation>
    <MacroOperator>
      <NickName>EdgeSuperimposition</NickName>
      <Name>macro-operator</Name>
      <Identifier>1</Identifier>
      <X-coordinate>199</X-coordinate>
      <Y-coordinate>108</Y-coordinate>
...
    </MacroOperator>
</Subroutine>
You can add new subroutines by using the menu >File::Import subroutines.
8. Generating code
Ariane can generate executable scripts that correspond to the current edited graph. Several languages are available; in the current version: Bash, MsDos, Python or Perl. The code generation dialog is accessible by Graph::Generate Code.
In the generated script, the Loader and Saver items become arguments of the script as well as Filename and Constant items if they are defined as script parameters (see their related property window).
To execute a Bash, MsDos, Pyhton or Perl scripts in a console, use the argument line to specify the list of input and output images. For example, consider the script "application.sh" which uses the two input images "image1.pan, image2.pan" and builds one output image "image3.pan":
console> bash application.sh image1.pan image2.pan image3.pan
For each generated script, the option -h displays the script usage and an example of execution:
console> bash application.sh -h

console> application.bat -h

console> python application.py -h

console> perl application.pl -h
9. Key Assist
These are a list of shortcuts used in the graph editor. They operate on the current selected item:
| Key | Effect |
|---|---|
| CTRL-R | Execution |
| Arrows | Moving |
| CTRL 0 | Display output #0 |
| CTRL 1 | Display output #1 |
| CTRL 9 | Display output #9 |
10. Customizing
Ariane is customized with three different files stored in a directory named "ariane":
 ariane +
        | - ariane.ini
        | - operators.cfg
        + - subroutines.cfg
The file ariane.ini is used to save:
- the preferences (eg., language, colors);
- the link to the library of executable operators;
The file operators.cfg is used to store:
- the list of the personal operators (see Section 6).
The file subroutines.cfg is used to store:
- the list of the subroutines (see Section 7).
This Ariane directory can be located in two different places. Only the first occurrence of the directory is used with respect to the following order:
- {installdir}/ariane, where installdir is the folder that contains the ariane.jar (or ariane.exe).
- {userhomedir}/.greyc/ariane.
Any further modifications of the preferences will be stored in the files of the selected directory.
Creating a portable customized Ariane distribution
To build a portable Ariane distribution (on a USB key, or CDROM for example), create a folder that contains the ariane.jar (or ariane.exe) file and an ariane folder that contains at least the file ariane.ini and optionally the files operators.cfg and subroutines.cfg. This can be done by creating a copy of the folder {userhomedir}/.greyc/ariane. It is then possible to change the preference for this portable version by the way of the interface.
folder +
       | - ariane.sh
       | - ariane.jar
       | - ariane.exe
       + - ariane +
                  | - ariane.ini
                  | - operators.cfg
                  + - subroutines.cfg
Customizing the library of operators
The library of executable operators is specified during the first execution of Ariane. It is then possible to change the library from the menu item Options::Customize Library.
A convenient library of operators must at least contains the two following folders:
- bin: it contains the binaries;
- lib: it contains the file ariane.cfg, and all necessary dynamic libraries (.dll, .so).
The file ariane.cfg is an XML file that describes the prototype of each executable operator as follows:
<ARIANE ariane.version="1.0">
<Library>
<Version>Pandore 6.5.0</Version>
<DocPath>/doc/operators</DocPath>
<Index>operatorsP0.html</Index>
  <Operator>
    <Category>arithmetic</Category>
    <Nom>pabs</Nom>
    <Documentation>/operatorsP0/pabs.html</Documentation>
    <Binary>pabs</Binary>
    <Parameters>0</Parameters>
    <Inputs>1</Inputs>
    <Outputs>1</Outputs>
  </Operator>
  <Operator>
  ...
  </Operator>
...
</Library>
</ARIANE>